Report Templates
Report Templates
When you point to a report template, the following information is available:
- report template name;
- resource to which it belongs (if you have access to more than one)
- report template type;
- list of tables and charts that it contains;
- list of bound objects.
When you click on a report template, it is selected in the Template field automatically.
The templates in the list are arranged in alphabetical order. You can use the dynamic filter above the list. In the drop-down list to the left of the search, you can select a resource.
The following actions are available:
or
: edit or view a report template (depends on your access rights);
: create a new template based on the selected one;
: delete a template (if you do not have enough access rights, the icon is dimmed).

Creating a Report Template
To create a new report template, press the New button. If you have access to more than one resource, select the required one and click Next.
In the report template, specify its name and select the type.
| Type | Description |
|---|---|
| Unit | The template is used to analyse the data from any single unit. |
| Unit group | The template is used to analyse the data from several units simultaneously. |
| User | The template is used to analyse the activity of users. |
| Driver | The template is used to analyse the work of drivers. |
| Trailer | The template is used to analyse the use of trailers. |
| Resource | The template is used to track the changes in the contents of the resource. |
| Retranslator | The template is used to analyse the work of retranslators. |
| Route | The template is used to analyse the passing of routes. |
| Group of drivers | The template is used to analyse the work of several drivers at the same time. |
| Group of trailers | The template is used to analyse the operation of several trailers simultaneously. |
| Passengers | The template is used to analyse passenger traffic. |
| Group of passengers | The template is used to analyse the traffic of the groups of passengers. |
| Geofence | The template is used to analyse which units have visited a geofence. |
| Group of geofences | The template is used to analyse which units have visited a group of geofences. |
It is not recommended to change the report type later, because when you change the type, all the contents and settings of the template are lost.
Below are the Report Contents, Settings and Bind tabs, on each of which the properties of the future report template are configured.
A list of the content added to the report template is shown below. To rename a component, click on it with the left mouse button and make the necessary changes. When working with the content list, the following actions are available:
: drag the component up/down;
: edit the properties of the table/chart;
: copy the table/chart;
: delete the component.
After executing the report, the result section first shows statistics (if added to the template), and then tables and charts in the order specified in the template.
Report Contents
You can add any number of tables to a report template, including tables of the same type. To add a new table, open the Contents tab in the properties of the required report template and click on the New table button.
In the table properties, specify its name and type and select the columns you want to include in it. If necessary, add custom columns and configure additional settings.
To edit the name of a column, click on it with the left mouse button. To use the default name of the column, click on the icon  in its line. The icon is inactive is the default name is used.
If necessary, you can change the sequence of columns in the table. To do this, click on the icon  to the left of a column and drag it to the required place while holding down the left mouse button.
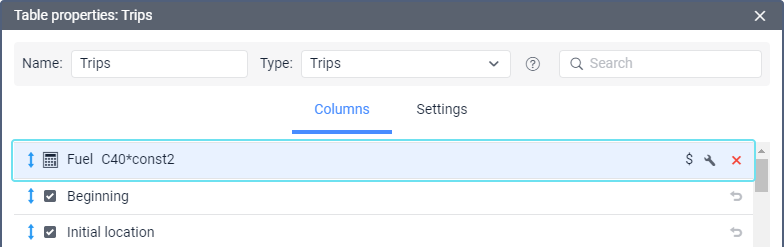
Adding Custom Columns
To add a custom column to the table, follow the steps below.
- On the Columns tab of the table properties, click on the Custom Column button
- Specify the formula for calculating the column value
You can use the following components in the formula Component Description Indexes of other columns Column indexes are shown to the left of column names after clicking on the Custom column button and don’t change regardless of the column position in the list. Indexes are indicated in the CNformat, for example,C0,C1,C24, and so on. To add an index to the formula, click on it in the list or enter it manually.
Next to the indexes of some columns (see below), you can specify the name of a sensor so that its readings are used when calculating the column value. Indicate the sensor name in parentheses after the index. For example, to calculate the value of the column with index C44 using the readings of the sensor named FLS1, typeC44(FLS1)in the formula. If the sensor name contains a closing parenthesis, replace it with a question mark. For example, to calculate the value of the column with index C54 using the readings of the sensor named (FLS2), typeC54((FLS2?)in the formula. Instead of the sensor name, you can use it's mask.
Specifying the sensor name works only with the indexes of the following columns:- Avg consumption by ImpFCS/AbsFCS/InsFCS/FLS;
- Consumed by ImpFCS/AbsFCS/InsFCS/FLS;
- Engine efficiency duration;
- Utilization;
- Useful utilization;
- Productivity;
- Cargo weight;
- Counter;
- Columns with a custom sensor value;
- Sensor (in the Digital sensors table);
- Columns with a temperature value (in the Orders table);
- Value (in the Sensor tracing and Messages tracing tables).
Duration values (engine hours, trip duration, and so on) are calculated in seconds. To convert them to hours in formulas, divide by 3600 using
/const3600.Unit parameters You can add the following unit parameters to the formula: rcoef: consumption by rates;dehr: daily engine hours rate;mcoef: mileage coefficient;imei: unique ID.
To add a parameter to the formula, enter its key or select it from the menu which opens after clicking on the three-dot icon.You cannot use the unique ID together with other components in the formula. Otherwise, a dash is displayed in the custom column in the report.
Unit profile properties The profile properties of the unit are added to the formula in the profile_field(key)format. You can select them from the menu which opens after clicking on the three-dot icon in the Formula field. In addition to the properties from the Profile tab, you can also find the Unit type property here.If a profile property contains a text value, you can’t use it together with other components in the formula. Otherwise, a dash is displayed in the custom column in the report.
Data on the report interval You can use the following data on the report interval in the formula: interval_days: interval duration in days;interval_hours: interval duration in hours;interval_beginning: interval beginning;interval_end: interval end.
To add this data to the formula, enter the required key or select it from the menu which opens after clicking on the three-dot icon.Custom fields Custom columns in reports can display data from general and administrative custom fields that are defined in the properties of system objects such as units, users and drivers.
Access rights
The following access rights are required:- View custom fields, to add values from general custom fields.
- View administrative fields, to add values from administrative custom fields.
Depending on the type of field you want to display, use one of the following functions in the Formula field:custom_field(field name), to display values from general custom fields (those not marked as administrative);admin_field(field name), to display values from fields that are marked as administrative.
- If the name of a custom field contains a closing parenthesis, replace it with a question mark. For example, to add the value of the custom field named
(mass)to the formula, entercustom_field((mass?). - Instead of the field name, you can use it's mask. If the names of several custom fields correspond to the indicated mask, the report shows the value of the field that comes first in the list of custom fields in the properties of the object.
- If a custom field has a numeric value (without the unit of measurement), you can use it in the formula either separately or together with other components. If it has a text value, you can use it only separately, or else a dash is displayed in the custom column.
General custom fields are displayed in reports on units, drivers, trailers, passengers, users and their groups.
Administrative custom fields are displayed in reports on units, unit groups and users.Previous row value The formula can contain a value from the previous row of any column formatted as #CN, where CN is the column index. Constant values You can use constant values formatted as constN where N stands for any number. For example, const-1.5, const10, and so on. Mathematical operations The following mathematical operations are allowed: - addition (+);
- subtraction (-);
- multiplication (*);
- division (/).
Parentheses of priority Parentheses are used to indicate the priority of an operation. For example, in the formula (C44+C54)/const2, the parentheses indicate that addition should be performed before division.Formula example:
(С1+С2+С7)*const1.5/rcoefSpecify the name of the custom column.
Indicate the unit of measurement (up to 10 characters).
If you use the custom column to calculate duration, select how it should be displayed in the Conversion drop-down list.
Item Description Without conversion Duration is displayed in seconds. Duration format The Duration format option from the table settings is used. If there is no such option, the result is displayed in the hours:minutes:seconds format. Date and time format The date and time format indicated in the user settings is used. If the value cannot be converted to the selected format, a dash is displayed in the custom column.- Click Save.
The custom column automatically goes to the top of the list. However, you can change its position in the standard way if necessary. Such columns are highlighted in blue
and do not have an index.
To edit the created column, click on the icon  , column name, formula, or unit of measurement, make the necessary changes and save them.
The value of the custom column in the Total row is calculated in the same way as for other rows, that is, in accordance with the specified formula that uses the values of the column.
- Parameters - configure grouping and sorting
- Settings - configure detailization, row numbering, total, time limitation as well as incomplete interval and duration format.
- Intervals filtration
Report Settings
- Description - you can type a text which is displayed in the tooltip when pointing to the name of the report template. The text should not contain more than 10,000 characters
- General - the format of the date and time, the measurement systems
- Map Output - elements can be drawn on the map as part of a report. They can be selected in this section. These can be tracks travelled by unit, goefences, as well as special markers in the form of small icons which can be put in the places of events, fillings, speedings etc
- Address - specify the format for displaying the address information. To do this select which elements of the address should be displayed
- Shifts - if this option is enabled, the information on the report is structured according to the shifts you specify
Binding
Related Articles
Sending a Report by Email
Sending a Report by Email To create the Send a report by email job, you should have: the Create, edit, and delete jobs access right to the resource in which the job is created; the View report templates access right to the resource in which the ...Settings
In the application settings, you can select units of measurement, mao, algorithm for planning routes, notifications, create warehouses, custom fields for orders and so on. To go to the Settings page, open the user menu by clicking on the username in ...Templates
This page displays templates for creating routes. You can use them if you should create similar routes regularly. A template stores information about the route points and the assigned unit. The Templates page consists of the following components: ...Reports
In this section, you can get information about active, planned and fulfilled routes in the form of reports. Reports are necessary for analyzing key parameters and optimizing driver's work. Report Execution To execute a report, specify its parameters ...Data in Reports
Data in Reports Time The time of completion/start/end of any state is displayed in the reports in the format specified in the General section of a report template. In the tables that include the duration of a state, the hours may not be combined into ...